
d.i.d. - Scalable Pen Plotter
Description
#d.i.d. - deep ink diver #[Our Github](https://github.com/ufficioprogettiperduti/Scalable-Pen-Plotter) - updated files and firmware #We are working on a new COREXY plotter with an integrated screen for autonomous plotting, you can check our [Instagram Page](https://www.instagram.com/ufficio_progetti_perduti/) to be updated on the development. --- **d.i.d. is a 3d printed, open-source, scalable, pen plotter. The aim of the project is to make a cheap, easy to build, printer made specifically for vector-based graphics.** From a precise pen made for technical drawing, to big markers used for graffiti; the way printing is perceived on paper is not bound anymore to the restrictions of a cartridge. The material on which it is printed now also has a role by himself: the roughness of the paper is not hidden by the inkjet but emphasized by the pen that physically touches the paper and travels on it. The main difference between printing with a normal printer and d.i.d. is that the machine is able to follow vectors as paths in the same way that a CNC router does. This allows to create graphics that are more fluid and overhaul more defined and vivid on paper. The materials and electronics used for the plotter are all standard and easy to source. The main frame is made of aluminum extrusion and 3d printed connections. The motors are all standard nema 17 stepper-motors and a single sg-90 servo motor. Everything is driven by a cheap Arduino Uno control board that handles the transition from g-code to movement. Furthermore, the software used to create g-code, Inkscape, is opensource as well. --------------------------------------------------------------------------------------------------------------------------- **24 January 2020 - Pre-Instructions and Photo Update** We managed to make a lot of cool photos! Instructions are coming and they've never been as beautiful! Mostly because they've never existed before. But that's another story! **02 January 2020 - Github Update** We've created a github repository with all the recent files and updates. Please check it out for organized files and software **23 December 2019 - Illustrator Plugin!** Thanks to the help of our first customer Alberto, we were able to make a plugin to hatch lines in illustrator! **[Download Here ](https://www.ufficioprogettiperduti.com/resources)** **30 November 2019 - New paper rollers! - no more paper issues!** We designed new rollers that prevent the paper from sliding! We used the flexibility of plastic to make the paper adhere better thus not move anymore. Super speeds are now an option! We are in the process of making super detailed building instructions too! Stay tuned! **5 November 2019 - New dimensions measurements** In the build of materials section you can now find new measurements for the A3 version and for a custom build. **27 October 2019 - STORE UPDATE** **Kits are available for order** on our **[NEW (yet unfinished) WEBSITE](https://www.ufficioprogettiperduti.com/online-store)**! Kits are available in three versions each configurable in different length (A4, A3, etc..). Unfortunately, for now we can only accept orders from e-mail as we can not yet afford a domain and a business plan in wix :C. **16 October 2019 - V1.1 UPDATE** We are working on a vinyl cutter attachment and a few new updated parts to be implemented in the V1.1 (New more modular carriage with lm8uu bearings - New paper rollers that adapt on different materials etc..). Meanwhile if you want to have a test on vinyl you can check **[Whitei](https://www.thingiverse.com/Whitei/about)** **[awesome remix](https://www.thingiverse.com/thing:3881505)** and his new carriage design --------------------------------------------------------------------------------------------------------------------------- **Here are a few videos of it in action** https://youtu.be/RkO-iulIUkc **Many thanks to the user JuanGg whose pen plotter project was a great inspiration.** 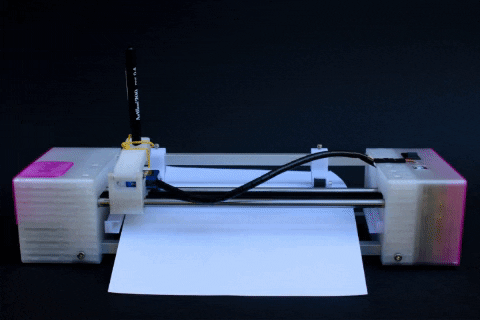 --- #BOM - Build of Materials **This is a list of the materials we used to create the plotter:** - 2 Nema 17 Stepper Motors - 1 SG90 Servo Motor - GT2 Belts - 1 Toothless Idler - 1 Toothed Idler - Various M3 and M4 Screws and Bolts - M3 Square Nuts (Prusa like) - Adhesive Sandpaper - *you can make it yourself with double sided tape if needed* - 1 Rubber Band - 1 Arduino Uno - 1 Arduino Uno CNC Shield - 1 Power Switch - 1 Power Adapter - *12V 3A Suggested* - 2 A4988 Stepper Motor Drivers *Dimensions are for the A4 version* - 2 Aluminium Square Extrusions 10mm x 10mm - 295mm - 1 Aluminium Square Extrusions 10mm x 10mm - 300mm - 1 Aluminium Square Extrusions 10mm x 10mm - 280mm - **Needs to be Precise** - 2 Steel Rods 8mm Diameter - 280mm - 1 Aluminium Tube 12mm Diameter 1mm Thickness - 255mm - **Needs to be Precise** *Dimensions for the A3 version* - 2 Aluminium Square Extrusions 10mm x 10mm - 382mm - 1 Aluminium Square Extrusions 10mm x 10mm - 387mm - 1 Aluminium Square Extrusions 10mm x 10mm - 367mm - **Needs to be Precise** - 2 Steel Rods 8mm Diameter - 367mm - 1 Aluminium Tube 12mm Diameter 1mm Thickness - 342mm - **Needs to be Precise** *Dimensions for the Custom version* - 2 Aluminium Square Extrusions 10mm x 10mm - Sheet of paper + 85mm - 1 Aluminium Square Extrusions 10mm x 10mm - Sheet of paper + 90mm - 1 Aluminium Square Extrusions 10mm x 10mm - Sheet of paper + 70mm - 2 Steel Rods 8mm Diameter - Sheet of paper + 70mm - 1 Aluminium Tube 12mm Diameter 1mm Thickness - Sheet of paper + 45mm --- #Firmware We chose to use Grbl. As it is easy to configure and powerful enough for our needs. We suggest using our **[modified version](https://github.com/ufficioprogettiperduti/Scalable-Pen-Plotter)**. This version adds support for a servo and is pretty much plug and play. The firmware is based on grbl 1.1f and is preconfigured to be used with a d.i.d. pen plotter Servo needs to be plugged on pin D11 (Z+ for CNC Shield) The following gcode controls the servo: M03S0 or M5 - PEN UP M03S255 - PEN DOWN --- #Software and Gcode To generate gcode you have many possibilities: - Inkscape with [JTechPhotonics Plugin](https://jtechphotonics.com/?page_id=2012) - Illustrator with [Diego Monzon Plugin](https://diegomonzon.com/illustrator-to-g-code-panel) ([Alberto Parziale](https://github.com/lavolpecheprogramma) made, in collaboration with us, a plugin to make fillable lines - [check on our website](https://www.ufficioprogettiperduti.com/resources)) - [Lightburn software](https://lightburnsoftware.com) comes at a fair cost and is a good all in one solution for gcode generation and machine control
Statistics
Likes
565
Downloads
0